SCRATCH TUTORIAL SPACE SHUTTLE MISSION STS-2020
Lesson 3 Import & Create Sprites
- Create a Sprite.
Scratch projects are made up of objects called sprites. You can change how a sprite
looks by giving it a different costume. You can make a sprite look like a person or a
train or a butterfly or anything else. You can use any image as a costume: you can draw
an image in the Paint Editor, import an image from your hard disk, or drag in an image
from a website.
You can give instructions to a sprite, telling it to move or play music or react to other sprites. To tell a sprite what to do, you snap together graphic blocks into stacks, called scripts. When you double-click on a script, Scratch runs the blocks from the top of the script to the bottom.
If you haven't already, Launch the Scratch program from your desktop. - Let's get started!!!
 Move the mouse pointer over the image and click to select freedombg background.
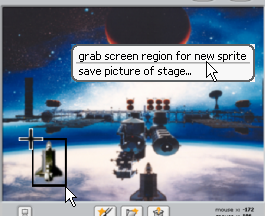
  The first Sprite we need is the space shuttle. To get our shuttle we are going to grab a region of the background.
Put your mouse pointer anywhere on the background image.
Right click the mouse
Click on grab screen region for a new sprite
Notice your mouse pointer turns into crosshairs.
Move the crosshairs to where you want to start grabbing.
Click and hold down the left mouse button.
Move the mouse to drag a box around the shuttle.
Let go of the left mouse button.
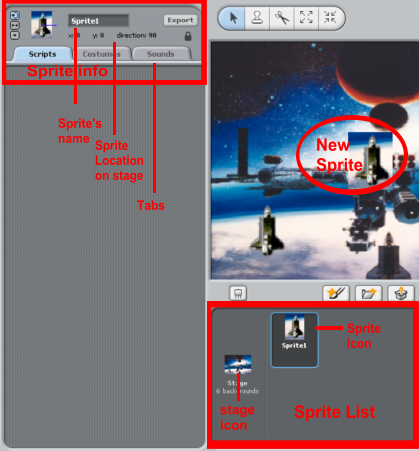
WOW!!! When you let go the mouse button a lot of things happen.
Our Scratch Interface changes from Stage backgrounds to our Sprite Interface
When we want to return to our Stage Background interface we have to click on the Stage icon.Try It.
To Return to the Sprite Interface click on a Sprite icon. Try It.
The blue outline around the icon means that is the one you have selected.
 Notice our Sprite is in the middle of the stage, Location x:0 y:0. We will move it later.
OOPs!! Your shuttle looks kinda like this.

That's okay, we get a do over.
Put your mouse pointer over the Sprite1 icon.
Right Click
Click delete.

Grab it again. Repeat until you like it.
Then
 Let's rename the Sprite.
In the Sprite Info box, Click inside the name box.
Type Shuttle
Let's edit the Shuttle costume.
Click on the Costumes Tab
Click on the Edit button

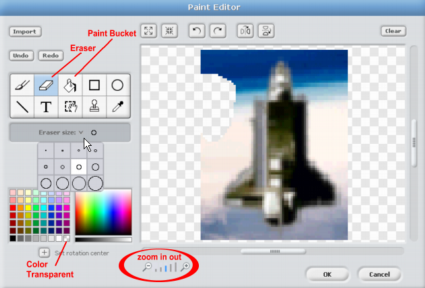
 We need to erase the area around the shuttle amd make it transparent, so we don't see it.
Click on the Eraser then click on the arrow by Eraser size, pick a larger one to start,smaller ones for close up detail work.
To make it easier to work, click on the zoom and zoom in.
To erase faster click on the transparent color to select it, then click on the Paint Bucket.
For close-up work click on the Eraser again.If you erase too much, use the Undo button.
If you mess up really bad, click Cancel and start over.
When you are happy with your image, Click OK. Then
- Finished Lesson 3
- Start Lesson 4 Create scripts (programs)
